Components | Installation | Features | Web Interface | Auto-Ping Reboot/Email | Router Config Examples
Instructions Page 1 2 3 4 5 6 7 Home
Hardware Installation:
- Connect the RPS-ERP II unit to a hub/switch using an RJ-45 Ethernet Cable
- Connect the Master Power Cord to the RPS-ERP II
- When done with setup and testing of the Remote Power Control Unit, connect your devices to the corresponding electrical ports on the back of the unit. Please note there is a 15 amp max. for all ports with a 6 Amp maximum per individual port.
Software Installation:
There are 2 options for software configuration of your RPS-ERP II. You can download the IPEDIT program below, or setup your computer on the same default IP Subnet as the RPS-ERP II, and access the unit directly by opening your web browser. See below for details. Note that the default IP address of the RPS-ERP II unit is 192.168.10.100 . If you place the remote power switch on your network and another computer/device has this IP address, you will not be able to access the RPS-ERP II unit. Please watch for this possible conflict.
Software Configuration – Option #1
- Once the RPS-ERP II is powered and the network cable is connected, you will need to download the configuration program, ipedit.exe by clicking here. Start the ipedit.exe program. The initial screen is shown below.
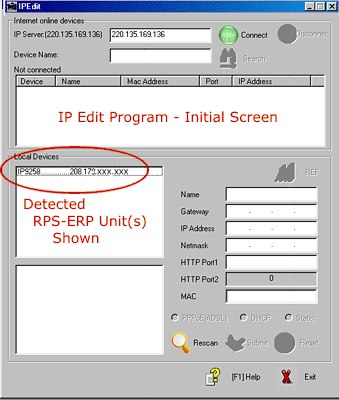
- The software will detect the RPS-ERP II unit. Click on the unit and you will be able to view the Network configuration on the right pane.
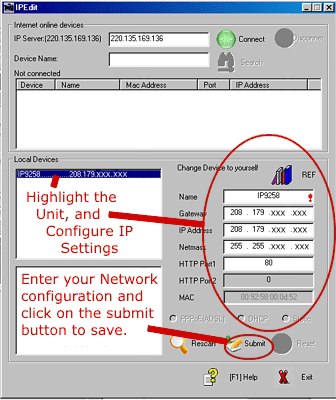
- You can rename the unit, edit the network settings and the http port. Click submit to save to the RPS-ERP II device.
- If you double click on the highlighted RPS-ERP II unit, your IE browser window will open and the web login screen will be shown. Alternatively, you can type the network address into IE in the form https://XXX.XXX.XXX.XXX Example: https://192.168.1.5 . Make sure the network cable is plugged into the RPS-ERP II unit and the master power switch is ON.The Default User Name is admin and the password is 12345678
Software Configuration Option #2
- The Default IP Address of the RPS-ERP II is 192.168.10.100. You need to set your computer to the same subnet in order to access the remote power controller via a web browser. The same subnet means the first three parts of the IP Address of your computer, such as XXX.XXX.XXX.abc must be the same as the RPS-ERP II unit and the last grouping, the abc, must be different. An acceptable IP address for your computer would be 192.168.10.10, Netmask 255.255.255.0 and default gateway of 192.168.10.1. You typically need to go into your Start > Control Panel > Network Settings > Select a Network Port > Right Click > Select Properties > Click TCP/IP > which should open up a network configuration window. Please remember to write down your initial settings so you can return your computer to its present state.
- Once your computer is on the same subnet as the RPS-ERP II unit, you can access the remote power switch by opening your IE browser and going to https://192.168.10.100 . The web login screen will be shown. Make sure the network cable is plugged into the RPS-ERP II unit and the master power switch is ON. The Default User Name is admin and the password is 12345678