Instructions Page 1 2
Installation – How To Configure: 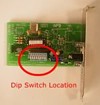
- To turn on the RPS-ATX features Dip Switch #1 must be set to the ON position. This enables the device to automatically push the power button after a power outage. The function allows PC’s with ATX type motherboards and a BIOS that requires the power button to be pushed to restart once the power returns to the computer via the RPS-ATX transformer.
- Dip Switch #2 determines the amount of time that the RPS-ATX will wait to push the power button after power is restored. If the Dip Switch #2 is OFF then the delay is 5 seconds. If ON the delay is 30 seconds.
- Dip Switch #3 determines the amount of time the power button will be held in the ‘closed shorted’ state. When OFF the hold time is 1 second. When ON the hold time is 3 seconds.
- To test your configuration, simulate a power loss condition by disconnecting and reconnecting the AC power. Then wait for the RPS-ATX to complete its programmed function and push your power button.
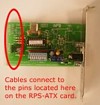
The RPS-ATX only function is to push the power button when the power returns. It simply restarts your computer when power is detected to the RPS-ATX power supply. To remotely reboot your computer, use the RPS-ATX with one of our other Remote Power Controllers, which will allow you to reboot a ATX System remotely by contacting the Remote Power Switch and initiating a power down/power up to the connected RPS-ATX power supply, thereby power up / rebooting your ATX System.
|