Email Setup
 |
|
|
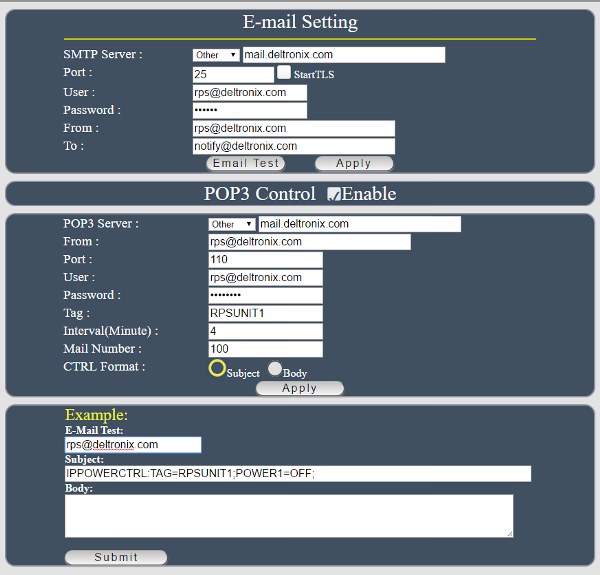
The RPS-NODE-9255Wifi can notify you via email when the system boots up. Additional options allow for the RPS Unit to send notifications when the current or temperature settings are exceeded. This option is configured in the Advanced Settings Button located at the top of the power control screen. Options are available for using the mail services of gmail, hotmail along with OTHER to use your own SMTP Mail server. Standard email configuration is shown in the picture. You can test your setup by using the EMAIL TEST button for sending email. The device also allows you to control the power on / off status of the power port by email. The unit will check your email account for a properly configured email message. Once found, it will act on the instructions in the email. To begin, check off the ENABLE box on the POP3 Control button. This will display the POP3 Control menu. POP3 Server: This is the mail server of your incoming control email. Port: The port ( typically 110 ) for the pop mail server. User: User name to login to pop account. Password: Password for the User Name Mail From: Senders Email Address TAG: Select a series of characters that the RPS-NODE-9255Wifi will use to recognize the message as a control command. An example formatting would be IPPOWERCTRL:TAG=RPSUNIT1; See above image for example. Interval (minutes): The time interval to check for email. Mail Number: The unit will check the last (Mail Number) of messages in the email account to search for the TAG and the command line entry. CTRL Format: Have the unit check the Subject or Body of the message for the Command Line. Note: The Command Line must use CAPITAL letters.
Example Command Line: IPPOWERCTRL:TAG=RPSUNIT1;POWER1=OFF; |
|
Previous | Next |
Power Control by Telephone