Components | Installation | Features | Web Interface | Auto-Ping Reboot/Email | Router Config Examples
Instructions Page 1 2 3 4 5 6 7 Home
|
Tier 1, Tier 2 and PLUS Software Features
The RPS-ERP II unit 4 Port Web Based Power Controller comes in 3 versions. The only difference is the software features that run on the hardware. You can upgrade the software ( firmware ) at a later date if you need the additional features. For more details, please our online instruction manual.
|
||||||||||||||||||||||||||||||||||||||||||||||||||||
| Login Screen |
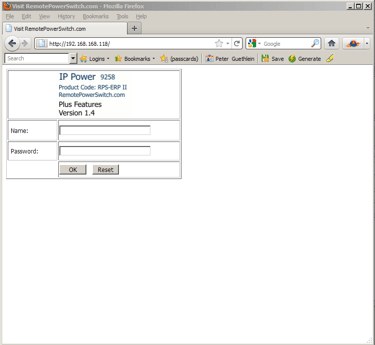 |
| Access the RPS-ERP II using your web browser. The address is the ip address you configured the network area of the software. (Example: https://XXX.XXX.XXX.XXX )There are 2 options for configuring the IP address. Click here for further information. |
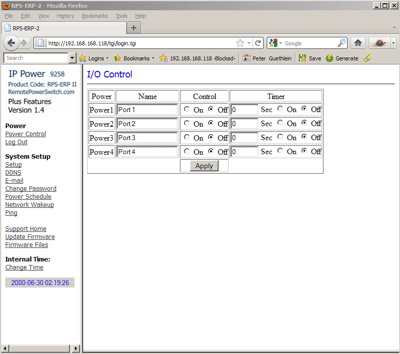
| 4 Port Power Control |
 |
|
Under the Power Menu selection click on the CONTROL link. Shown is the main power control area of the RPS-ERP II. You can control 4 outputs individually. Under the control column, you can select the ON / OFF condition desired. Then simply hit the APPLY button to have the RPS-ERP II perform the operation. The Timer Column allows for a delay time in seconds before the desired action is performed. If you wanted to power up/down a series of devices connected to the 4 ports of the unit, you can stagger each device by entering a delay time in seconds. For instance, if the power to all 4 ports is OFF, you could enter in 20, 40, 60, 80 in the Timer Column Text Box and select the ON Radio Button. Clicking apply will cause a countdown to occur with the first port turned ON in 20 Seconds, the next in 40 Seconds, the next at 60 seconds and the final port at 80 seconds. To refresh your power control screen, click the Control Link on the Main Menu. |
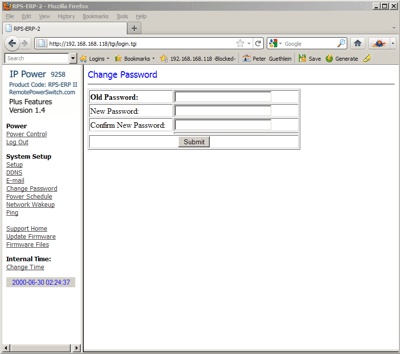
| Change Password |
 |
|
Click the Password Link on the main menu. The default user name is admin and the default password is 12345678 . The maximum password length is 8 characters. Valid Characters for the password are A-Z, a-z, 0-9. Click the submit button to update the password settings for the RPS-ERP II Remote Power Switch. If you forget your password, go to the login page of the RPS-ERP II unit. Enter in a user name of super user and click OK then wait a few seconds and power off the RPS-ERP II using the main power switch on the back of the unit. Turn the unit back ON and the RPS-ERP II will reset back to the default user name and password. |
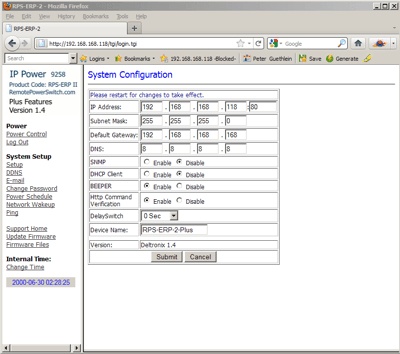
| System Network Configuration |
 |
|
The SETUP link will allow you to configure the network properties of the RPS-ERP II unit. You can configure the IP Address, Subnet Mask, Default Gateway (Usually your routers IP Address ) and DNS. If you enable DHCP, the RPS-ERP II will attempt too receive its network configuration from your DHCP server. You can also enable/disable the BEEP sound the unit issues when acknowledging a command. If your software version has a HTTP Command Verification option, leave the setting on cookie+base64. The DelaySwitch option will initiate an automatic delay before completion of any on/off event in the Power Control section. The standard port the RPS-ERP II unit uses for its internal webserver is port 80. If you desire to use a different port, you will have to download the IPEDIT.EXE program which allows for port changes. Click Here for further information on the IPEDIT.EXE program. Once the port is changed, you will have to access the RPS-ERP II unit from your web browser by appending the port number to the address line. If you were to configure the unit for access on port 8181, your web browser address line would reflect https://XXX.XXX.XXX.XXX:8181 (https://YourIPaddress followed by a Colon and then 8181) |