Components | Installation | Features | Web Interface | Auto-Ping Reboot/Email | Router Config Examples
Instructions Page 1 2 3 4 5 6 7 Home
The Ping Function is only available on the RPS-ERP2-Plus Model. It was programmed to automatically act as a watch dog. If the devices attached to the RPS-ERP2-Plus do not respond appropriately, the RPS-ERP2-Plus will restart the device automatically.
Click to Enlarge
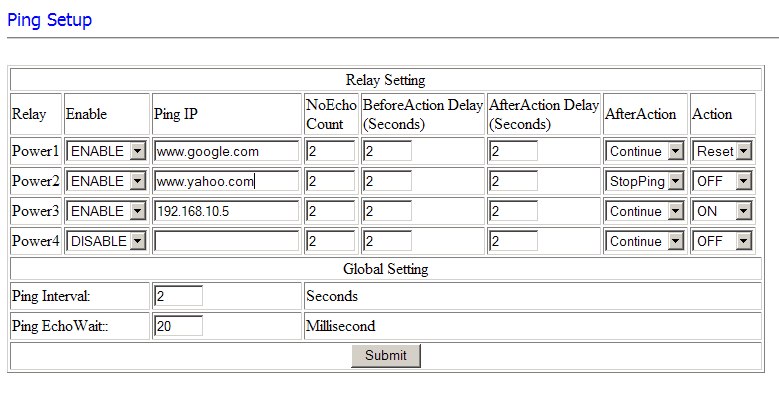
Enable: This setting turns on or off the ping function.
Ping IP: The IP Address of the device that you are trying to ping.
No Echo Count: The number of Unsuccessful Ping responses before an Action is Triggered.
Before Action Delay: After No Echo Counts have reached its number, this is the number of seconds before an action occurs.
After Action Delay: After the action occurs, this is the number of seconds before the AFTER action occurs. *Note: This is also known as the PC or Device Startup Time. Set this to number to 90 or above to prevent an infinite looping of the device.
After Action: This is the command to continue pinging or to stopping pinging.
Action: From here you can set the device to Reset, Turn On or Turn Off the attached device.
Ping Interval: The number of seconds between each unsuccessful Ping.
Ping EchoWait: The number of Milliseconds that the RPS-ERP2-Plus Ping will wait for a response from connected device.
Do not use the delay function in the setup menu. It will be ignored when the Ping Function is active. You must have a valid DNS configured in the settings menu for host names/URLs to be interpreted correctly. For best results, use the IP Address in the ping settings. The IP Address can be located on your internal network or anywhere on the internet ( for instance, to test that your internet modem is connected and accessible to the internet, you would ping a WAN IP Address located on the internet.)
Example Ping Setup
1.) The Device will Ping Your designated IP address or host.
2.) If a response is received from by the RPS-ERP2-Plus within Ping Echo Wait time the device continues to ping the Device at the Ping Interval.
3.) If no response is receive the remote power switch will Set No Echo Count to 1. And the process starts from step 1 again. Once the No Echo Count is reached Step 4 occurs.
4.) The Device will wait for the Before Action Delay before doing the Action (Reset Turn On or Turn Off device).
5.) Once Action has been activated, the device will wait for After Action Delay and the device will either continue or stop based on your After Action settings.
Email Setup
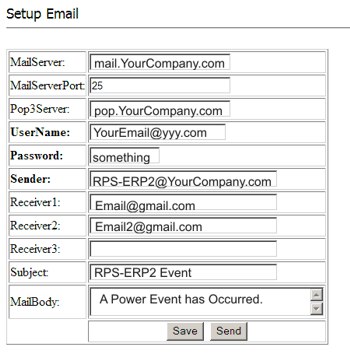
2.) Pop3Server: Incoming Mail Server. IP address from your ISP for sending E-mail when RPS-ERP2-Plus is on the Internet.
Please also set the DNS of your ISP in the system configuration menu.
3.) Password: the password of this mailbox must be 8 characters and only contain a-z, A-Z and 0-9. This is critical for proper operation.
4.) Sender: Fill in the name of sending email address. The Mail Server must support SMTP and these fields must be filled in correctly.
5.) Receivers: no longer than 50 letters.
6) Subject: the subject of the mail no more than 50 letters.
7) Mail Body: please type the content of the mail here, it cannot be left empty.
After you have finished all of the above settings, click “SAVE“ and your settings will be saved.