|
Components:
Your RPS-SP4L package includes:
- The RPS-SPL4 4-Port Remote Power Switch Unit
- Standard US 110-120V Power Cord (Euro 220-240V Model does not include power cord)
- Units ship individually in industrial (OEM) grade packaging
- A printed manual is not supplied. We maintain our manual online for this product to allow for updates and revisions as needed and keep our price low.
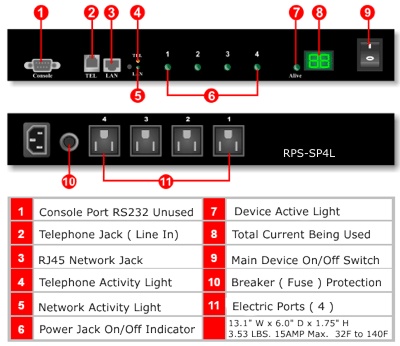
Device Layout:
How to reset the RPS-SP4L Device to factory settings: Next to the Tel and Lan LED there is a small hole which is the RESET button. To reset the device, insert a pin into the reset hole and press. This will initiate the reset function and reboot the device. When complete, your settings should remain, however your users will be removed and only the admin user name login will be active with a password if admin. The IP address of the unit will be reset to the default value of 192.168.1.10. Download the RPS-SP4L-IPEDIT program to reset your IP address or follow the instructions on the next page of this manual.
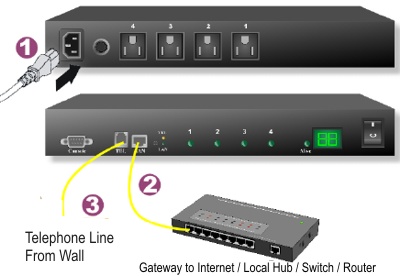
Hardware Installation:
Hardware Installation:
- Connect the RPS-SP4L unit to your internet gateway using your router/ hub/switch with a RJ-45 Ethernet Cable
- Connect a telephone line to the telephone jack on the unit. It is best if you can connect the unit directly from the wall jack to its telephone port.
- Connect the Master Power Cord to the RPS-SP4L
- Only after you are familair with the operation of the unit and you have completed the device configuration per the instructions in the manual, should you connect the devices you wish to remotely control to the RPS-SP4L unit. Please note there is a 15 amp max. for all ports with a 6 Amp maximum per individual port. The front panel LED will list the power consumption through the RPS-SP4L unit.
Next >
|